
Godzilla Pinball Gameplay Explained: Why This Layout Is So Brilliant


There are plenty of great pinball machines, but very few layouts are remembered as true masterpieces.
Designed by Keith Elwin, Godzilla is widely regarded as one of the greatest modern pinball machines ever created—not simply because of its rules, theme or toys, but because of the way every shot connects to the next.
In this new gameplay series, we're not teaching rules or strategies. Instead, we're looking at why a layout feels so satisfying to play and how the designer created a machine that flows naturally while constantly giving players meaningful choices.
If you'd like to customise your machine after reading, explore our Godzilla Pinball Mods collection. You can also check out our Best Godzilla Pinball Mods guide and learn more about Keith Elwin Pinball Designer.
A Layout That Never Stops Giving You Options
One of the defining characteristics of Godzilla is that almost every successful shot immediately creates another interesting decision.
Rather than simply returning the ball to a flipper, Keith Elwin constantly asks:
"Where should the player go next?"
That philosophy is what makes the machine feel alive.
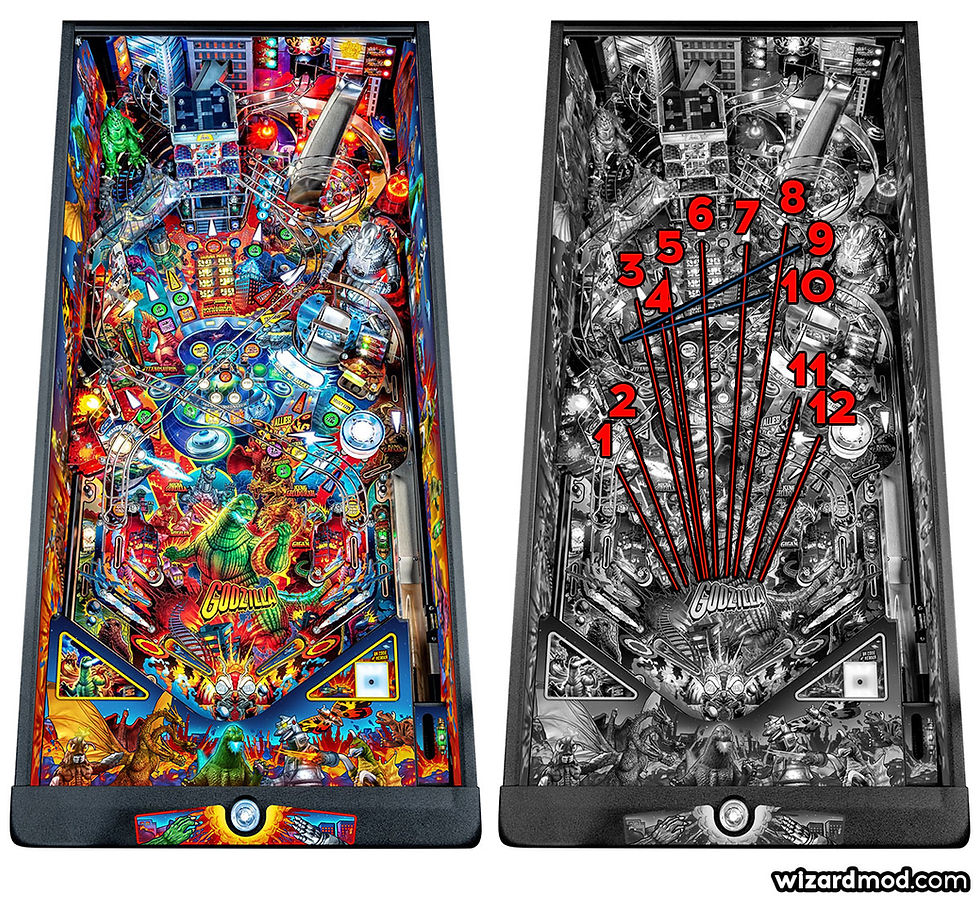
Using the numbered playfield image above, let's explore how those decisions were built into the design.
Shots 2, 4, 9 and 10 – Four Shots Working Together
The first truly brilliant sequence begins with Shot 2.
This left-side lane isn't just another orbit.
The ball travels through the spinner, passes behind the upper left flipper and reaches Shot 4, the circular magnetic post.
Sometimes the magnet catches the ball.
Sometimes it doesn't.
That tiny bit of unpredictability immediately changes what happens next.
When the magnet holds the ball, it gently releases it onto the upper left flipper.
From there, you suddenly have two completely different options:
Shot 9, the upper loop.
Shot 10, the Tail Whip.
What's remarkable is that these shots aren't isolated features.
They're part of one continuous sequence where every successful shot naturally feeds another.
Instead of forcing the player to stop and think, the layout encourages instinctive movement from one objective to the next.
The Magnet Changes Everything
The bridge magnet deserves special attention because it's far more than a visual toy.
It actually controls the rhythm of the game.
If the ball reaches the upper flipper at full speed, Shot 9 is often the easier option.
But when the magnet catches the ball first, it releases it much more gently.
That slower feed suddenly makes the difficult Tail Whip (Shot 10) far more achievable.
In other words, the machine isn't simply asking you to make a shot.
It's changing the conditions under which that shot is played.
Very few layouts do this so naturally.
A Perfect Destruction Jackpot Moment
The bridge magnet also creates one of the most memorable moments in the entire game.
During the destruction jackpot sequence, the magnet traps the ball and starts the countdown.
Three... Two... One...
The ball is released in exactly the right position, giving you one opportunity to hit Shot 9 and collect the jackpot.
Everything pauses for just a second before the action explodes again.
It's a fantastic example of controlled pacing.
The Dynamic Building Changes the Entire Playfield
Perhaps the cleverest toy on Godzilla is the collapsing building.
At first glance, the two main ramps appear straightforward.
Shot 3
Shot 8
But once the building rotates, those same shots behave differently.
The ball exits change.
The timing changes.
The feel of the game changes.
Without redesigning the layout, Keith Elwin effectively creates multiple versions of the same playfield.
The geometry evolves as the game progresses, keeping experienced players constantly adapting.
Shots 5 and 6 – Risk and Reward
Behind the building sits one of the tightest shots in the game.
Shot 5 is narrow and demanding.
When successful, however, it feeds into Shot 6, creating one of the most satisfying sequences on the playfield.
Many of the game's biggest rewards are built around this relationship.
The layout constantly encourages players to decide whether to attempt safer shots or attack tighter, higher-value opportunities.
That balance between accessibility and precision is one of Godzilla's greatest strengths.
The Upper Loop Never Feels Repetitive
Shot 7 is another excellent example of intelligent layout design.
The inside loop travels through a spinner before feeding the upper flipper once again.
Instead of simply ending the sequence, it gives players another opportunity to continue attacking the upper playfield.
This creates long flowing combinations where skilled players can keep the ball moving without losing momentum.
Mechagodzilla Is More Than Just a Toy
The small ramp leading towards Mechagodzilla (Shot 11) is another feature that shows Keith Elwin's creativity.
Initially, it's a ramp.
Later in the game, it transforms into a bank of targets.
That single mechanical change completely alters how players approach the right side of the playfield.
Rather than adding another toy, Stern made one existing feature perform multiple roles.
It's an elegant solution that keeps the layout feeling fresh throughout every game.
Even the Hardest Shots Feel Fair
One of the reasons Godzilla appeals to players of every skill level is that almost every shot feels achievable.
Even Shot 1, tucked away on the far left, looks intimidating without feeling unfair.
Every lane has been carefully positioned so beginners can still experience success while advanced players are rewarded for precision.
That's an incredibly difficult balance to achieve.
The Skill Shot Is More Interesting Than It Looks
Even launching the ball demonstrates how much thought went into the layout.
Rather than simply plunging into the playfield, skilled players can use the launch to feed Shot 2 from the opposite direction.
It's a small detail, but it immediately tells players that the layout has been designed with creativity in mind.
Nothing feels accidental.
Controlled Chaos
Down near Shot 12, the scoop begins modes and advances the game's progression.
Nearby, the lower right pop bumper introduces an element that players can't fully control.
Most of Godzilla rewards precision and planning.
The pop bumper briefly introduces uncertainty before handing control back.
That contrast keeps every game exciting.
Too much randomness becomes frustrating.
Too little randomness becomes predictable.
Godzilla strikes an excellent balance.
Why Godzilla's Flow Feels So Good
People often describe Godzilla as a "flow machine."
That's true—but flow isn't simply about making lots of ramps.
The real genius is how almost every successful shot naturally leads to another meaningful shot.
The layout is constantly asking:
"Now what?"
Should you attack the bridge?
Continue the upper loops?
Risk the building shot?
Aim for Tail Whip?
Go after Mechagodzilla?
Those decisions happen almost instinctively because the geometry guides you towards them.
That's what separates a good layout from a legendary one.

Keith Elwin's Design Philosophy at Its Best
Godzilla isn't considered one of the greatest modern pinball machines because of a single toy or one spectacular feature.
It's the way every part of the playfield works together.
Magnets alter timing.
The building changes geometry.
Loops feed loops.
Shots create new opportunities instead of simply ending.
The result is a layout that feels exciting for first-time players while remaining endlessly rewarding for experienced collectors.
That's the hallmark of Keith Elwin's best work—and one of the biggest reasons Godzilla continues to be regarded as a modern pinball masterpiece.


Comments